Soap Making Supplies for Beginners: Everything You Need
What you actually need to start making soap at home: the beginner kit, silicone loaf mold, and mica colorants I use every single batch. No wasted purchases.

I started making soap on a random Saturday afternoon about two winters ago, and I am still not entirely sure what possessed me. I had been buying a particular artisan bar from a local farmer's market, loved it with the kind of quiet loyalty I usually reserve for a really good moisturizer, and then one day the vendor was just gone. Retired. My soap was gone.
A reasonable person would have found another bar. Instead, I decided I would learn to make soap myself.
This turned out to be one of my better impulse decisions. Not because I am now running a soap operation out of my kitchen (I make a batch every few weeks, enough to keep myself stocked and to give to friends who have become unexpectedly enthusiastic about receiving handmade soap), but because the process itself is exactly the kind of slow, sensory, hands-on activity my brain needed without knowing it. Melting a base, adding fragrance and color, swirling two shades together in a mold, watching it set. It is absorbing in the best way.
My first attempt was a mess, though. Not catastrophically, just wastefully. I bought too many supplies at once, made some regrettable craft store choices, and ended up with a shelf of things I never used again. So let me spare you that part. Here is what you actually need to get started, and what I would buy if I were doing it over.
Melt and Pour Is the Right Starting Point
Before we get to supplies, a quick note on method, because it matters for what you buy.
There are a few ways to make soap. Cold process is made from scratch by combining lye with oils and allowing saponification to happen over four to six weeks of curing time. It gives you total control over every ingredient and produces long-lasting, beautiful bars, but it involves working with lye, which is caustic and requires real safety gear. Hot process is similar but uses heat to speed the reaction. Neither is the right starting point for someone just exploring the hobby.
Melt and pour soap is what I started with and what I still reach for regularly. The saponification has already been done in the base before you buy it. You melt it, add fragrance and color, pour it into a mold, and it sets in a few hours. No lye handling. No weeks of curing time. You can make finished bars in an afternoon, and the results look genuinely professional once you get the hang of the process.
Everything in this post is geared toward melt and pour.
The Three Supplies That Actually Worked
A Complete Starter Kit
My first kit was not good. My second was the Prime Creations Soap Making Kit and it was the one that finally made soap making click for me.
What sets it apart is the quality of the base. A soap base that smells slightly off underneath will compete with whatever fragrance you add, and no amount of lavender oil fixes a base that smells faintly plasticky. This one does not have that problem. It melts clean, smells neutral, and takes fragrance the way a good canvas takes paint.
The silicone molds are thicker and sturdier than what I had seen in other kits at the same price. They hold their shape when you pour in hot soap base instead of flexing and spilling. The fragrances included are better than expected, particularly a lavender and a vanilla that I still use regularly even now that I have built out my own fragrance collection. The liquid dyes blend smoothly without separating in the base.
The full kit includes four pounds of soap base, six fragrances, six liquid dye colors, stirring sticks, two stainless steel cutters, a silicone loaf mold, a pouring pitcher, a cutting box, individual cavity molds, soap wrappers, dried rose and lavender petals for decoration, and packaging bags. That is a lot in one box. I made about twelve bars from this kit before I needed to restock anything.
The honest limitation: the fragrance and dye quantities are starter-sized. Once you know what you enjoy and want to mix and match freely, you will want individual bottles. But for a full first month of batches, this kit removes the overwhelm of figuring out what to buy and where.

Prime Creations Soap Making Kit
The complete starter kit that made soap making finally click for me. Includes 4 lbs melt and pour base, six fragrances, six liquid dyes, silicone loaf mold, pouring pitcher, cavity molds, cutters, presentation packaging, and dried botanicals. Clean-smelling base, properly thick molds, and better-than-expected fragrances. A full first month of batches in one box.
A Dedicated Silicone Loaf Mold
Once I made enough batches to know I was not stopping, the next thing I bought was a standalone silicone loaf mold with more capacity than the one my kit came with. Kit molds are fine for learning, but once you start buying soap base in bulk (which happens naturally once you realize how much faster you go through it than expected), making full loaves that you slice into individual bars is so much more efficient.
The X-Haibei Large Soap Loaf Mold is what I use now, and it is one of those purchases where I genuinely cannot imagine going back. It holds 2200ml, which translates to eight to ten full-sized bars per batch depending on thickness. The silicone is thick enough to hold its shape when full of hot soap base without needing an external wooden box, though I set mine on a small baking sheet during pours just for stability.
The part that surprised me most was how different the finished bars look compared to individual cavity molds. Cavity molds give you identical bars every time. A loaf mold gives you bars that are each slightly different, especially when you pour two colors in ribbons and do a light swirl. Slicing the finished loaf open is genuinely one of my favorite parts of the whole process.
What to know: this mold does not include a cutter. I use a bench scraper and a ruler to get consistent slices, which works perfectly. If you want perfectly uniform bars, a dedicated soap cutter is a nice next purchase but not strictly necessary to start.

X-Haibei Large Soap Loaf Mold Silicone
The silicone loaf mold I reach for every single batch. Holds 2200ml (eight to ten full-sized bars). Thick silicone keeps its shape when full of hot soap base. Makes beautiful loaves that slice into individually unique bars, especially when you work with two or more colors. Place on a baking sheet for stability during the pour. No cutter included.
Mica Powder Colorants
Liquid dyes are functional. Mica powders are where soap making becomes genuinely beautiful.
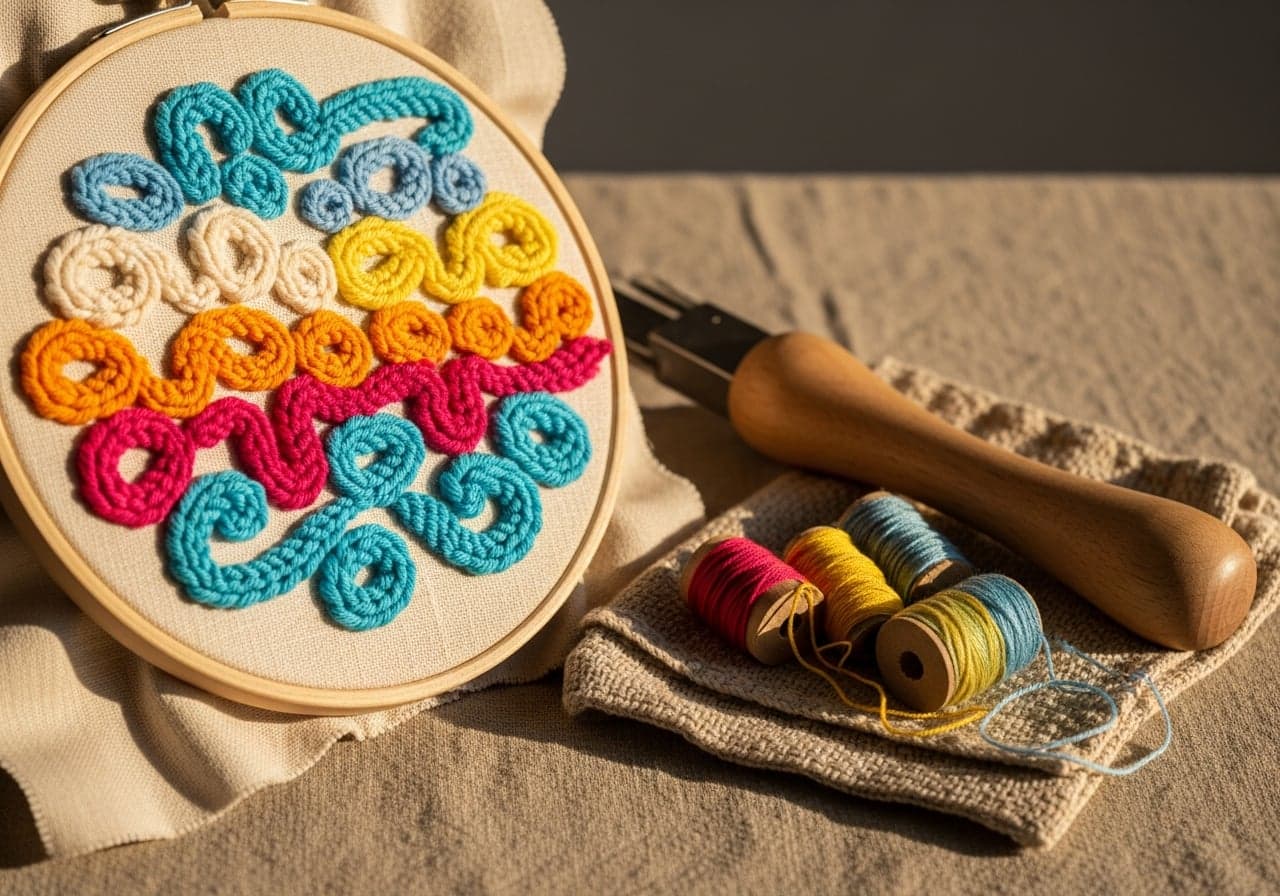
Mica is a cosmetic-grade mineral pigment ground into a fine, silky powder. When you stir it into melted soap base, it creates shimmer and depth that liquid dyes cannot replicate. You can divide your melted base into two or three cups, add a different mica shade to each, and pour them in ribbons or layers into your loaf mold. When you slice the finished loaf, every bar has a slightly different swirl. It sounds a little fussy but it is actually very forgiving, and the results look like something from a boutique soap shop.
The bMAKER 16 Mica Pigment Powder set is where I started and still the set I recommend. Sixteen shades in sample-sized bags covers a full palette: dusty rose, sage green, midnight blue, warm gold, soft lavender, deep burgundy, and more. Having sixteen to start with is exactly right for figuring out which shades you actually like before buying larger jars of anything.
Use less than you think. Start with about a half teaspoon per pound of base and adjust from there. The pigments disperse smoothly into melted base without clumping, and they stay stable in the finished bar without fading or bleeding over time.
What did not work: a cheaper mica set I tried early on had powders that clumped instead of dispersing, leaving visible specks in the bars rather than smooth color. The bMAKER powders have not done that once in over a year of use.

bMAKER 16 Mica Pigment Powder for Soap Making
The mica colorant set that turned plain white bars into something I am genuinely proud to give as gifts. Sixteen cosmetic-grade shades in sample sizes so you find your favorites before committing to larger jars. Disperses smoothly in melted soap base without clumping. Rose gold, sage, and lavender are my most-reached-for shades. Start with a half teaspoon per pound of base.
The Supporting Supplies Worth Having Before Your First Batch
These are not glamorous but they make the difference between a smooth first batch and a frustrating one.
A digital kitchen scale. Fragrance oil is added at a ratio of about one ounce per pound of soap base. Without a scale, you are guessing, and getting the ratio wrong either leaves you with fragrance too faint to smell or so strong it becomes headache-inducing. A cheap digital kitchen scale is under $15 and makes every batch more consistent.
Isopropyl alcohol at 91% or higher, in a spray bottle. This was the tip I wish someone had given me before my first batch. Spray the top surface of your poured soap immediately after pouring and any air bubbles on the surface disappear instantly. You also use it between color layers in multi-tone loaves, spraying the set bottom layer before adding the second color so the two layers bond instead of separating. This one technique visibly improves finished bars.
Soap-safe fragrance oils. Not all fragrance oils behave the same way in soap base. Some cause it to seize, cloud, or change texture. The fragrances in starter kits are already formulated for soap, which is one reason starting with a kit is useful. When you buy fragrances individually later, look specifically for ones labeled melt and pour or cold process safe.
A heat-safe pouring pitcher. A Pyrex measuring cup with a handle works perfectly and goes in the microwave without any issues. Something with a pour spout makes controlled pours much easier, especially when working with multiple colors at once.
How I Run a Batch
My current process: I melt soap base in 30-second microwave intervals until fully liquid. Fragrance goes in at about one ounce per pound, stirred gently to avoid adding air bubbles. I then divide into two or three smaller cups and add mica color to each. I pour in ribbons into the loaf mold and do a light swirl with a skewer if I want more blending between the shades.
The mold sits at room temperature for about two hours until fully set, then goes in the freezer for 20 minutes to help with unmolding. After slicing and a 24-hour wait for the bars to fully firm up, they are ready to use or wrap.
The whole process is around three hours, most of it waiting. I often run a batch on Sunday afternoons alongside making candles, since both crafts share that same unhurried, sensory rhythm that genuinely resets my mood for the week ahead.